Many of us use wordpress as a blogging platform because WordPress is a very popular CMS and it is much easier to use. Before using WordPress you need to know better about it, otherwise you can get various problems. After installing WordPress, many people started using it without any necessary changes, which is not right at all. There are some basic settings (changes) of WordPress that should be done immediately after installing WordPress.
Let's take a look at the 10 essential settings.
1. Prevent search engines from indexing your site
Many are shocked to see why you refrain from indexing your site in search engines, but when you install WordPress for the first time, it is a very important task. Generally, when we install WordPress, there is no content in our blog and there is no content, so first fix all the settings and index some of the required pages such as about, contact, copyright policy and some post.

Follow the steps below to keep an application from the site index.
Setting=> Reading=> Search Engine Visibility=> Enable Discourage Search Engines from indexing this site.
2. Change the default permalink
SEO for a blog or website's permalink is of great importance. You can easily use SEO optimize url, using the helpful permalink. When you install WordPress, the default permalink for your site / blog is as like this (http://www.yourdomain.com/p=1) which is not SEO friendly. You should change it by post name such as http://www.yourdomain.com/my-first-post/ or you can customize it.
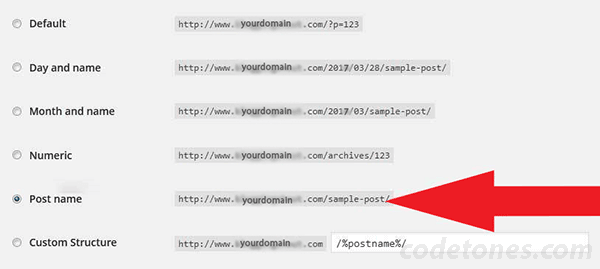
To change the permalink, follow the steps below.
Setting=> Permalink=> Click on Post Name and save.
3. Fix the blog / site's permanent URL (with www or without www)
Basically there is no major difference between URLs with www and www. But when you install WordPress blog for the first time, please fix any one and do not change it later. If you change it again and again it may be a problem with indexing your blog.

Follow the steps below to change the URL.
Go to Setting=> General Setting=> Here you have to choose WordPress address URL field and Website Address URL field and then save changes.
4. Change the default admin account
If the admin does not specify the username when WordPress is installed, then by default, a user named admin will be created. This is very important for the security of WordPress site. You can change the default admin user name or delete the default admin user name and you can create new admin name.

Follow the steps below to change or delete the default defaults.
In WordPress Dashboard, Go to Users=> To Add a New Admin or to Delete default admin ID You need Go to Users=> All Users.
5. Disable new user registration
If your blog does not have any public functions, deactivate the new user registration, because if new user registrations are running then your blog will be spamming a lot. If you want to keep the post post facility on the blog, then you can create new users and give them their username and password.

Follow this step to disable new user registration.
Go to Dashboard Setting=> General Setting=> look for Membership, unchecked Anyone can register checkbox and save the changes.
6. Fix time zone, date and time format
It is important to change the default time zone, date and time format for WordPress blog security. So after installing WordPress, please change your local time zone and timing.
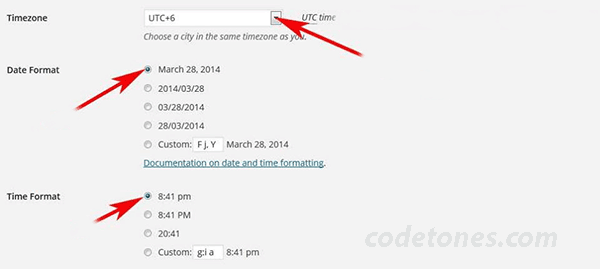
Follow the steps below to change time zone, date and time format.
Go to Setting=> General Setting=> change the Default Time Zone, Date Format and Time Format
7. Update WordPress Ping List
As default, WordPress has only two Ping services. After updating WordPress, please update the ping list so that when new posts are published on your blog, notifications on the ping site will automatically go away.

Follow the ping list to change
Below is a list of some of the ping services that you can use.
http://blogsearch.google.com/ping/RPC2
http://api.feedster.com/ping
http://rpc.twingly.com
http://api.moreover.com/ping
http://api.my.yahoo.com/rss/ping
http://bblog.com/ping.php
http://coreblog.org/ping/
http://ping.amagle.com/
http://ping.bitacoras.com
http://ping.blo.gs/
http://ping.bloggers.jp/rpc/
http://ping.feedburner.com
http://ping.myblog.jp
http://ping.weblogs.se/
http://rpc.blogrolling.com/pinger/
http://rpc.pingomatic.com
http://rpc.technorati.com/rpc/ping
http://www.blogoole.com/ping/
http://www.blogoon.net/ping/
http://www.blogshares.com/rpc.php
http://www.blogsnow.com/ping
http://www.newsisfree.com/RPCCloud
http://www.popdex.com/addsite.php
http://www.snipsnap.org/RPC2
8. Change the default avatar
When Wordpress is installed, the Mystery Man avatar as the default, can change it using Gravator Logo or Identicon.

Follow the steps below to change the avatar.
Setting=> Discussion=> Default Avatar=> Change it to Gravator Logo and click save
9. Change the default image location
After installing WordPress, the default image location is organized as Organize my uploads in month and year based folders. Uncheck this option to change it.

In WordPress Admin Dashboard Go to Setting=> Media=> Uploading Files=> Uncheck the default files save directory and save the changes.
10. Enable Akismet plugin
As soon as WordPress is installed, the unicet plugins are installed as default. Activate this plugin to protect your blog from spam comments. Akismet plugin protect your wordPress blog from unwanted malicious attack.
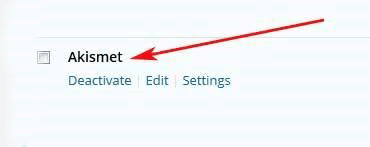
Go to Plugins=> Click on Active Akismet=> Add API Key and Active
By following above steps, you can secure your website. Of course you should up to date with wordpress. So build your website by following those instractions and enjoy.




Leave a Comment
1 Comment